
How to Verify Smart Contracts Using Web3.js and Solc?
Smart contract deployment is a big step forward in the evolution of the blockchain industry, but it still has many challenges. The trinity of smart contracts, sub-smart contracts, and oracles has made a few people scratch their heads at the same time. Smart contracts are computer programs that self-execute on blockchain networks, and they are developed using a programming language known as Solidity.
The transparency and immutability of smart contracts are among their primary benefits. Nonetheless, it is critical to verify their code for security and dependability. In this blog, we will discuss how to verify smart contracts using Web3.js and Solc? Continue reading this blog!
What is Web3.js?
JavaScript libraries such as Web3.js allow developers to interact with Ethereum blockchains. The Ethereum network interface offers a user-friendly and uncomplicated approach to connecting with the Ethereum blockchain. This includes the ability to send transactions, retrieve data from the blockchain, and engage with smart contracts. What is Solc?
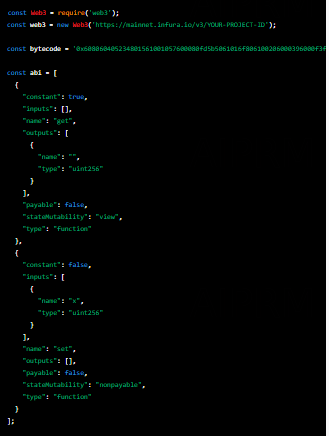
Solc is the Solidity compiler. It generates a bytecode that can be executed on Ethereum’s virtual machine (EVM). It is a command-line tool that can be used to compile Solidity contracts into bytecode.
Why Verify Smart Contracts?
Verifying smart contracts is crucial for ensuring their reliability and security. Smart contracts are executed on blockchain networks, which are decentralized and transparent. As a result, a smart contract cannot be modified once it is deployed on the blockchain. A code that has errors or vulnerabilities can be exploited by attackers, resulting in financial loss.
By verifying the code, you can ensure that it is free from errors and vulnerabilities. This is done by comparing the deployed contract’s bytecode with the bytecode generated by Solc. If the two match, it means that the deployed contract’s code is the same as the code that was compiled by Solc. This ensures that the contract’s code has not been tampered with and is safe to use.
How to Verify Smart Contracts Using Web3.js and Solc?
Here are the steps to verify smart contracts using Web3.js and Solc:
Step 1: Compile the Smart Contract
The first step is to compile the smart contract using Solc. You can do this by running the following command:

This command will generate the bytecode for the smart contract, which you can then save to a file.
Step 2: Deploy the Smart Contract
Next, you need to deploy the smart contract to the Ethereum network. You can do this using Web3.js by writing a script that deploys the contract to the network. Here is an example of a script that deploys a smart contract:
Step 3: Get the Contract Address
Once the contract is deployed, you need to get its address. You can do this by calling the options.address property of the contract object:
![]()
Step 4: Get the Deployed Bytecode
Next, you need to get the bytecode of the deployed contract. You can do this using Web3.js by calling the getCode method:
![]()
Step 5: Compare the Bytecode
The final step is to compare the compiled bytecode with the deployed bytecode. You can do this by comparing the two bytecodes using an assertion library like chai. Here is an example of a test script that compares the two bytecodes:
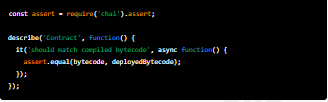
If the two bytecodes match, it means that the contract’s code has not been tampered with and is safe to use.
Verifying smart contracts is crucial for ensuring their reliability and security. In this blog, we discussed how to verify smart contracts using Web3.js and Solc. By following the steps outlined in this blog, you can ensure that your smart contracts are safe to use and free from errors and vulnerabilities. If you are interested in learning more about smart contracts and blockchain development. Our team of experts can help you learn the skills you need to build and deploy secure and reliable smart contracts on the Ethereum blockchain. Contact us today!


